The application supports processing files in the following formats: jpg, jpeg, png, webp, bmp, tif, tiff.
The original file remains unchanged during processing unless overwriting is specified with a special key.
Paths can be specified using absolute or relative formats in the command line. If a path contains spaces, it should be enclosed in quotes.
1.Options list (keys)
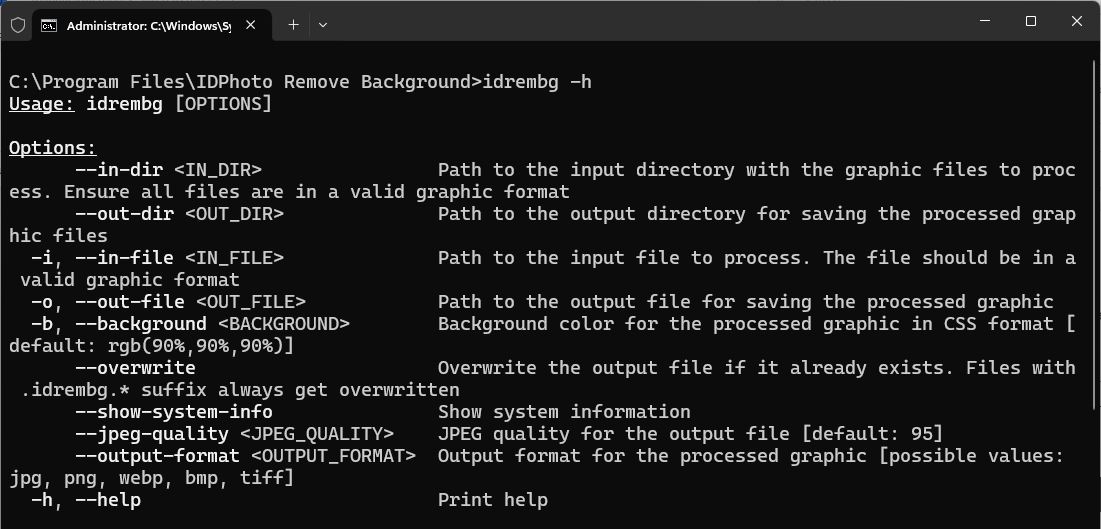
Start using IDPhoto Remove Background with the -h or –help key. This command displays all available application options in the console.
Example:
or
|
-i, –in-file <file path>
|
–
|
processes one single file (image)
|
|
-o, –out-file <file path>
|
–
|
sets the location, name, and format of the processed file
|
|
–in-dir <folder path>
|
–
|
processes all files in a folder
|
|
–out-dir <folder path>
|
–
|
specifies the folder for saving processed files
|
|
-b, –background <color>
|
–
|
sets the background color for the processed images
|
|
–overwrite
|
–
|
replace (overwrite) the processed file if it already exists
|
|
–show-system-info
|
–
|
displays application and system information
|
|
–jpeg-quality <value>
|
–
|
sets the compression level for the processed image (for JPEG files)
|
|
–output-format <format>
|
–
|
sets the format of the processed file
|
|
-h, –help
|
–
|
shows the list of available keys in the console
|
2.Processing a Single File
To process a single image file, simply specify the key -i or –in-file followed by the path to the source file.
The other command line option settings include the following:
•the folder for saving the processed image, specifying its name and format (key -o or –out-file)
•compression level (key –jpeg-quality, only for JPEG)
•background color (key -b or –background)
-i or –in-file
-i, –in-file <path to the source file> – processes one file (image). The processed image will be saved in the same directory as the source file, with a filename that combines the original name and the suffix .idrembg (e.g., if the source is 001.jpg, the processed file will be 001.idrembg.jpg). If a file with this name already exists, it will be overwritten. Files with the .idrembg suffix are always overwritten.
The processed file will retain the same format as the original. If no specific background color is chosen, it will default to light gray.
Example:
|
>idrembg -i D:\1in\001.jpg"
|
or
|
>idrembg –in-file "D:\1in\001.jpg"
|
Result: A processed file D:\1in\001.idrembg.jpg with a light gray background will be created next to the source file D:\1in\001.jpg.
-o or –out-file
-o or ––out-file < path to the processed file > – specifies the location, name, and format of the processed file as indicated in the path.
Example:
|
>idrembg -i "D:\1in\001.jpg" -o "D:\2out\001.png"
|
or
|
>idrembg –in-file "D:\1in\001.jpg" –out-file "D:\2out\001.png"
|
Result: a processed PNG file 001.png will be created in the D:\2out folder. The background color of the processed image will be light gray.
3. Processing a Folder
To process a folder containing image files, you only need to specify the key –in-dir <path to the source folder>.
The other command line option settings include the following:
•the folder where the processed images will be saved (–out-dir)
•file format (–output-format)
•compression level (–jpeg-quality, for JPEG only)
•background color (-b, –background)
–in-dir
–in-dir <path to the source folder> – processes all files in the folder in formats: jpg, jpeg, png, webp, bmp, tif, tiff.
Processed files will be saved in the same folder as the original source files.
Each processed file will retain the format of the original and will include the suffix .idrembg in its name (e.g., source: 001.jpg, processed: 001.idrembg.jpg). If a file with this name already exists, it will be overwritten.
Each processed file will maintain the original format, and all images will have a light gray background.
Example:
|
>idrembg –in-dir "D:\1in"
|
Result: in the D:\1in folder, a processed file with the same format will be created next to each source file, with the suffix .idrembg added to its name (e.g., 001.idrembg.jpg). The background color of the processed images will be light gray.
Use other keys to set destination folder, format, size and background color for processed images.
–out-dir
–out-dir <path to the folder> – specifies the folder where processed files will be saved.
Example:
|
>idrembg –in-dir "D:\1in" –out-dir "D:\2out"
|
Result: the processed files will be saved to the D:\2out folder.
Each processed file will retain the same name and format as the original file (e.g., original: D:\1in\001.jpg, processed: D:\2out\001.jpg).
The background of all images will be light gray.
–output-format
–output-format <format> – specifies the format for the processed files. Available options include: jpg, jpeg, png, webp, bmp, tif, and tiff.
Example:
|
>idrembg –in-dir "D:\1in" –out-dir "D:\2out" –output-format png
|
Result: all processed images will be saved in PNG format, as specified by the –output-format option, regardless of the original file format.
4. Common options for file and folder
-b, –background
-b, –background <color> – sets the background color of the processed image. You can select any color from the CSS palette, including options with varying degrees of transparency using the alpha channel.
The application supports the following color formats: hex, rgb(rgba), hsl(hsla) and named colors.
If the -b or –background option is not specified, the application will default to a light grey background color (rgba(230, 230, 230, 230)).
Example for file:
HEX
|
>idrembg -i "D:\1in\001.jpg" -b #D0E3EF
|
RGB
|
>idrembg -i "D:\1in\001.jpg" -b rgb(208,227,239)
|
Result: A processed file D:\1in\001.idrembg.jpg will be created in the D:\1in\001.idrembg.jpg folder. The image will have a blue background.
Example for folder:
HEX
|
> idrembg –in-dir "D:\1in" -b #D0E3EF
|
RGB
|
> idrembg –in-dir "D:\1in" -b rgb(208,227,239)
|
Result: processed files will be created in the D:\1in folder. All images will have a blue background.
Transparent background
To obtain a processed image with a transparent background, the source file must be in a format that supports transparency, such as PNG or TIFF.
If the source file is in PNG or TIFF format, there’s no need to specify the format of the processed file. However, if the source file is JPEG (JPG), which does not support transparency, you should change the processed file format to PNG or TIFF. To do this, use the -o (–out-file) option for individual files or the –output-format option for folders.
Example for file:
source file format – PNG
|
>idrembg -i "D:\1in\001.png" -b transparent
|
Result: a processed file 001.idrembg.png with a fully transparent background will be created in the D:\1in folder.
the source file format is JPG, you need to add the -o (–out-file) key.
|
>idrembg -i "D:\1in\001.jpg" -o "D:\2out\001.png" -b transparent
|
Result: a processed 001.png file with a fully transparent background will be created in the D:\2out folder. Since the original file is in JPG format, which does not support transparency, adding the -o option is necessary to specify the processed file format as PNG.
Example for folder:
If source files format in the folder is PNG
|
>idrembg –in-dir "D:\1in" -b transparent
|
Result: processed files with fully transparent background will be created in the D:\1in folder.
If source files format in the folder is JPG, you need to add –output-format key.
|
>idrembg –in-dir "D:\1in" -b transparent –output-format png
|
Result: in the D:\1in folder you will have processed PNG files with a fully transparent background. Since the source files are in JPG format, which does not support transparency, adding the –output-format option is necessary to set the processed files’ format to PNG.
Background with Partial Transparency
To set a partial transparent background, you need to use RGBA (not RGB) or HEX color formats, which have a 4th value added – the degree of transparency.
In RGBA, transparency is specified by a number from 0 (transparent) to 1 (opaque): 0 corresponds to 0%, 0.5 to 50%, 0.8 to 80%, 1 to 100%, etc. For example, for the color rgba(230,230,230,230,0.5) the transparency value is 0.5.
In HEX format, the transparency value is specified in hexadecimal numbers. For example, for color #E6E6E6E680 the transparency value is 80.
Processed files should be created in PNG or TIFF formats that support transparency.
Example for file:
RGBA
|
>idrembg -i "D:\1in\001.png" – b rgba(208,227,239,0.5)
|
HEX
|
>idrembg -i "D:\1in\001.png" -b #D0E3EF
|
Result: a processed file 001.idrembg.png with a semi-transparent blue background will be created in the D:\1in folder.
Example for folder:
RGBA
|
>idrembg –in-dir "D:\1in" -b rgba(208,227,239,0.5)
|
HEX
|
>idrembg –in-dir "D:\1in" -b #D0E3EF
|
Result: a processed file 001.idrembg.png with a semi-transparent blue background will be created in the D:\1in folder.
–overwrite
–overwrite – replaces (overwrites) a file if it already exists.
Files with the .idrembg suffix are always overwritten, regardless of whether the –overwrite option is used.
Example for a file:
|
>idrembg -i "D:\1in\001.jpg" -o "D:\2out\001.jpg" –overwrite
|
Result: a processed file 001.jpg will be created in the D:\2out folder. If a file with this name already exists in the folder, it will be overwritten.
Example for folder:
|
>idrembg –in-dir "D:\1in" –out-dir "D:\2out" –overwrite
|
Result: processed files will be created in the D:\2out folder. If files with the same names already exist in this folder, they will be overwritten.
|

|
When the -i (–in-file) and –overwrite options are used together without specifying the -o (–out-file) option, the original file will be overwritten.
Example:
|
>idrembg -i "D:\1in\001.jpg" –overwrite
|
Result: the processed file 001.jpg will be created, the original file will be permanently deleted.
|
|
|
When using the –in-dir and –overwrite options together without specifying the –out-dir option, the original files in the folder will be overwritten.
Example:
|
>idrembg –in-dir "D:\1in" –out-dir "D:\2out" –overwrite
|
Result: processed files named as the original files will be created in the D:\2out folder. The original files will be permanently deleted.
Use these combinations only if you are sure, you no longer need the original files!
|
–jpeg-quality
–jpeg-quality <value> – adjusts the compression level of the processed image (applicable only to JPEG files) to reduce file size. Lower values result in lower image quality and smaller file sizes.
Example for a file:
|
>idrembg -i "D:\1in\001.jpg" –jpeg-quality 80
|
Example for a folder:
|
>idrembg –in-dir "D:\1in" –jpeg-quality 80
|
Result: the processed images will be created with a compression level of 80, resulting in reduced quality compared to the original images and smaller file sizes.
5. Additional keys
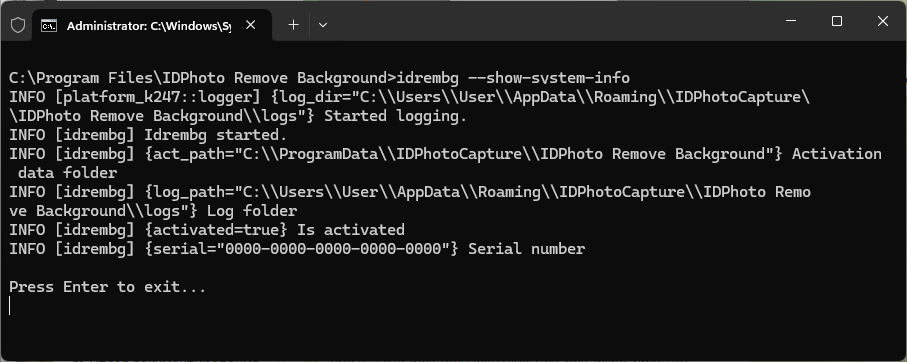
–show-system-info
–show-system-info – displays information about the application on the console:
•The folder containing the log files
•The folder containing the activation utility
•The activation status (whether the application is activated or not)
•The serial number, if the application is activated
Example:
|
>idrembg –show-system-info
|
Result: