The image processing dialogue contains face detection, framing, adjustments settings and part of the resulting image size settings.
The dialogue may be called up in three ways. The first way: File menu > Processing settings. The second way: from the side menu by the Processing settings button.
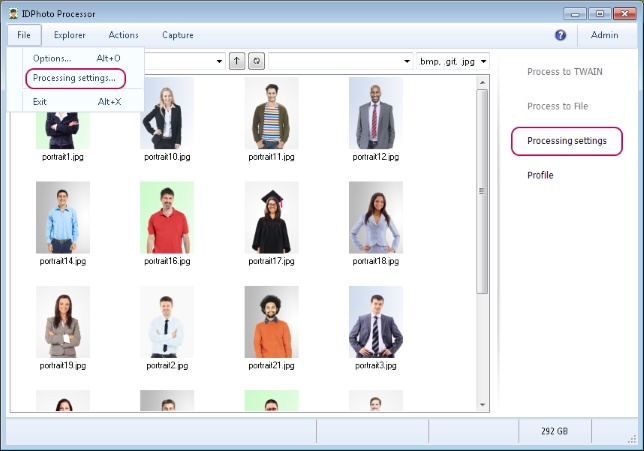
The third way: the dialogue is called up while the processing is progressing. The user can do it manually by double clicking on the required image in the explorer with the left mouse button, or the application will call up the dialogue automatically during the processing.

text
The Show processing window setting determines in what cases the dialogue will be called up automatically during processing. You can find out more on the application behaviour settings in the General Settings section.
In the first two cases, the dialogue will open for the standard test image. If you change the settings in the dialogue for the test image, the new settings will be accepted as the default ones. If you change the settings in the dialogue called up during processing, then the new settings will be applied only to the current image.
Let's call up and view the dialogue of processing for the test image.
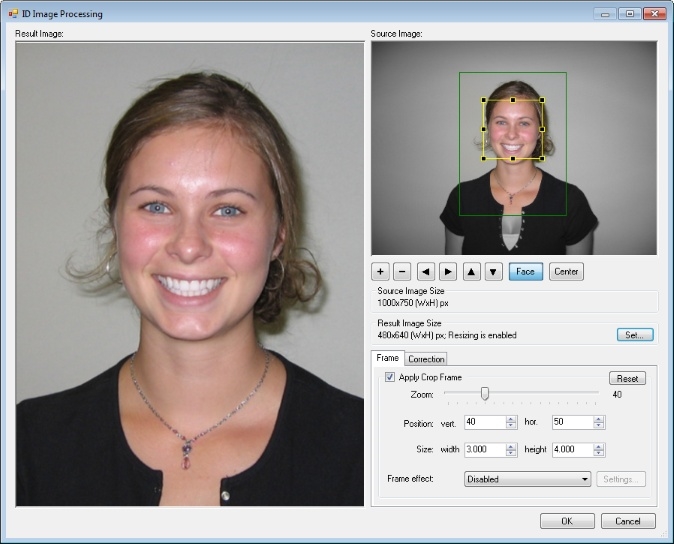
The most part of the space in the dialogue is allotted to the processing result preview window. To the right, there is an original image view window. Settings are placed in the lower part of the dialogue.
In the source image preview window, two bounding boxes are applied on the photo: the internal yellow box and the external one which may be green or red. The internal box outlines the face area. No bounding box will be present if the face is not detected or the face search is disabled by means of the application settings. The face bounding box can be enabled or disabled with the Face button which is located below the source image window. The internal box can be expanded, reduced or moved to the left, to the right, up or down. This can be done with the mouse in the source image window or through the button toolbar below the window. All actions with the internal box are automatically applied to the outer one.
The outer box shows the image margin after which cropping of the image will be performed. If the distance between the face area and image margins is smaller than the distance set in the settings, then the outer box will be red. For example, if the face is too close to the edge of the photo.
Below the image window there is a toolbar with buttons for setting the boxes. Let's list the buttons it contains and their respective functions.
The ![]() button increases the area of the face to be outlined together with the frame box; correspondingly, the
button increases the area of the face to be outlined together with the frame box; correspondingly, the ![]() button decreases it.
button decreases it.
The ![]()
![]()
![]()
![]() arrow buttons move the outlined face area together with the frame box to the left, to the right, up and down.
arrow buttons move the outlined face area together with the frame box to the left, to the right, up and down.
The ![]() button enables and disables outlining the face area.
button enables and disables outlining the face area.
The ![]() button enables and disables outlining the centre of image.
button enables and disables outlining the centre of image.
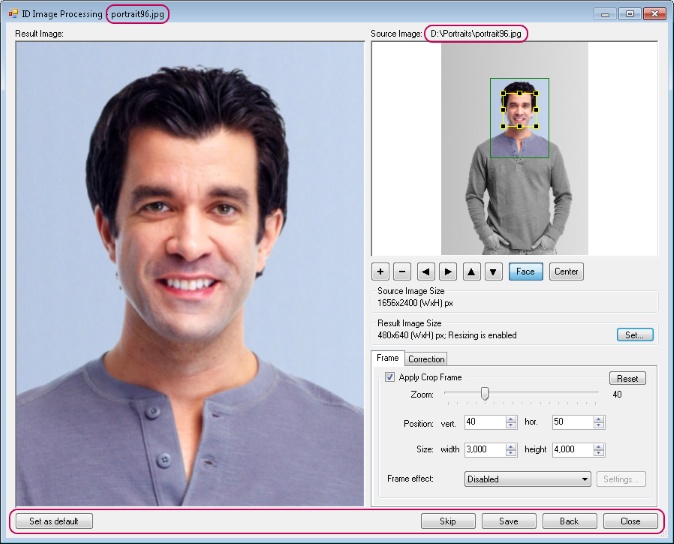
Then, we'll call up and view the dialogue for the image being processed. Please remember that you need to double click on the required image in the explorer with the left mouse button.
What distinguishes the dialogue called up during processing from the dialogue for the test image is the presence of the following elements:
| • | A short name of the file being processed is indicated in the title of the dialogue window. |
| • | A full name of the file being processed is indicated above the source file window. |
| • | OK and Cancel buttons are replaced by the buttons for saving the image, skipping the image or cancelling the whole process of processing. Please refer to the Actions chapter for more detail. |
The contents of the chapter are as follows: