Start inPhoto Capture PS.
Enter the menu File > Options > the External tools tab.
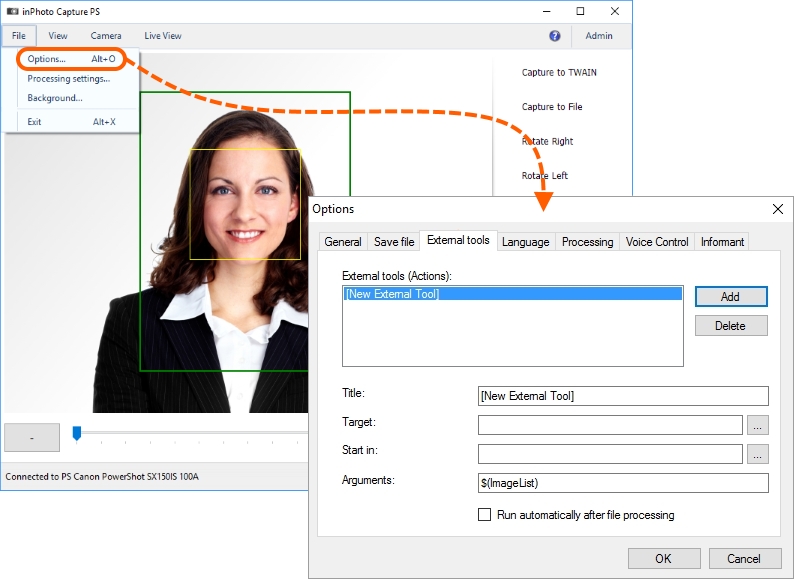
Press the Add button. After that, the form fields will become active.

Please remember that the fields for connection of external tools are described in the beginning of this chapter, the Connection section.
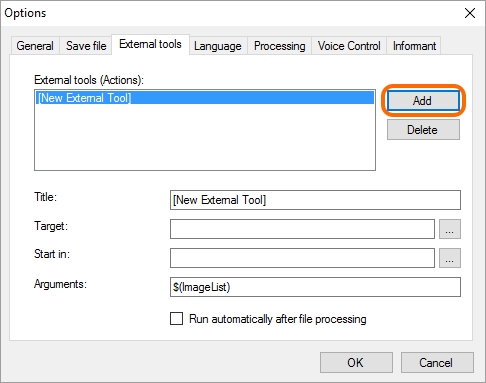
In the Title field, you can enter any name that is convenient for you to designate the tool being connected.
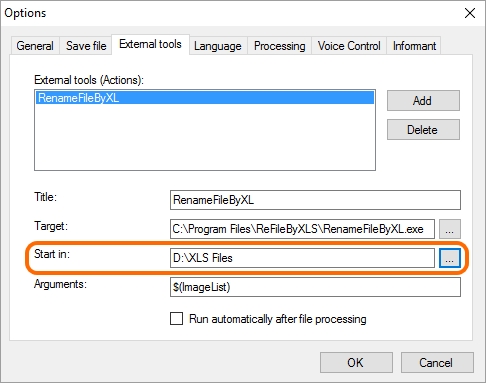
In the Target field, please enter the path to the executive file RenameFileByXL.exe.
After completing the Title and Target fields, RenameFileByXL will appear in the External tools (Actions): list.

In the Start in field, please indicate the path to the folder containing the xls file.
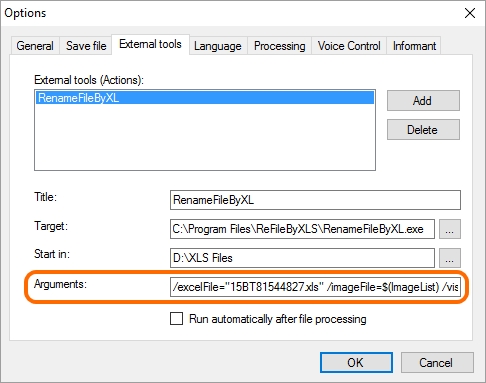
In the Arguments field, please enter the following arguments for the command string.
/excelFile - path to the xls file. Mandatory.
If you have indicated, in the Start in field, the path to a folder where inPhoto Capture PS must search for axillary files, there is no need to assign to /excelFile the full path to the xls file, it is enough to only state the name.
Example: /excelFile="15BT81544827.xls"
If the Start in field not filled in, you must appoint to the /excelFile parameter the full path to the xls file.
Example: /excelFile="C:\Program Files\ReFileXLS\XLS files\15BT81544827.xls"
/imageFile is a path to the image to be renamed. Mandatory.
It is the most convenient to use for this parameter the $(ImageList) variable that is placed by default in the Arguments field and contains the full name of a processed image.
Example: /imageFile=$(ImageList)
You can also assign to the /imageFile parameter the full name of an image file via forming the future image name using the saving settings. We will show how to make it at the next step.
Example: /imageFile="D:\Original\image.jpg"
/visibleColumns are numbers of the columns that will be indicated in theRenameFileByXL window and used for searching. The numbers of columns 0, 1, 2, 3... correspond to naming in letters A, B, C, D... in the xls file Mandatory.
Example: /visibleColumns=0,1,2
/nameColumn is a number of the column the values from which will be used as an image name. Mandatory.
Example: /nameColumn=0
/hasHeaderRow gets the value true of false. The table in the xls file may contain a title. It should be excluded from the search. true means the first line of the table is not considered in the search, false means it is. By default, the false is active.
In our example, the table contains a title that is to be excluded from the search, so we have to set true for /hasHeaderRow.
Example: /hasHeaderRow=true
/destDir is a path to the folder where the renamed photos will be stored. If the folder is not indicated, the renamed photos will be stored to the folder with the original photos. Optionally.
Example: /destDir="D:\Result"
The full argument string will have, in our example, the following appearance:
Version 1 with use of the $(ImageList) variable and the Start in field:
/excelFile="15BT81544827.xls" /imageFile=$(ImageList) /visibleColumns=0,1,2 /nameColumn=0 /hasHeaderRow=true /destDir="D:\Result"
Version 2 with full names of the files:
/excelFile="C:\Program Files\ReFileXLS\XLS files\15BT81544827.xls" /imageFile="D:\Original\image.jpg" /visibleColumns=0,1,2 /nameColumn=0 /hasHeaderRow=true /destDir="D:\Result"
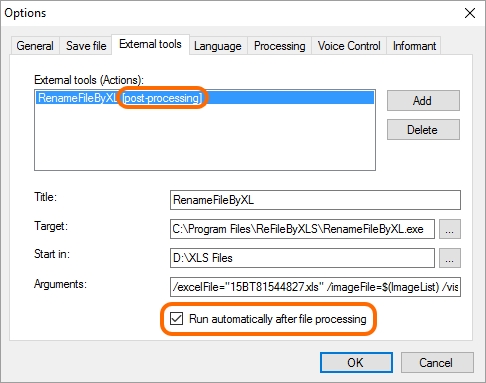
Please activate the Run automatically after file processing setting. After that, you will see near the RenameFileByXL name the text [post-processing], that means the tool will be run automatically after processing.
Please pay attention to that if the Run automatically after file processing setting is disabled, RenameFileByXL will not be run.
Then press the OK button to save the connecting settings.
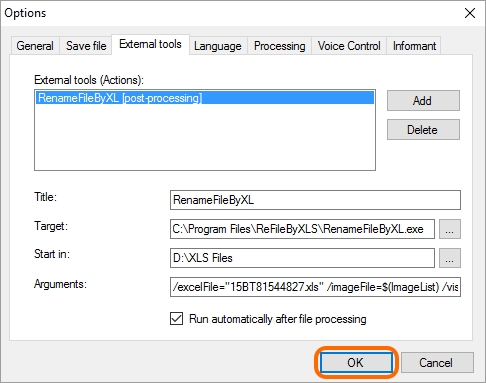
Done! The tool is connected.